MilkPowder Burfi


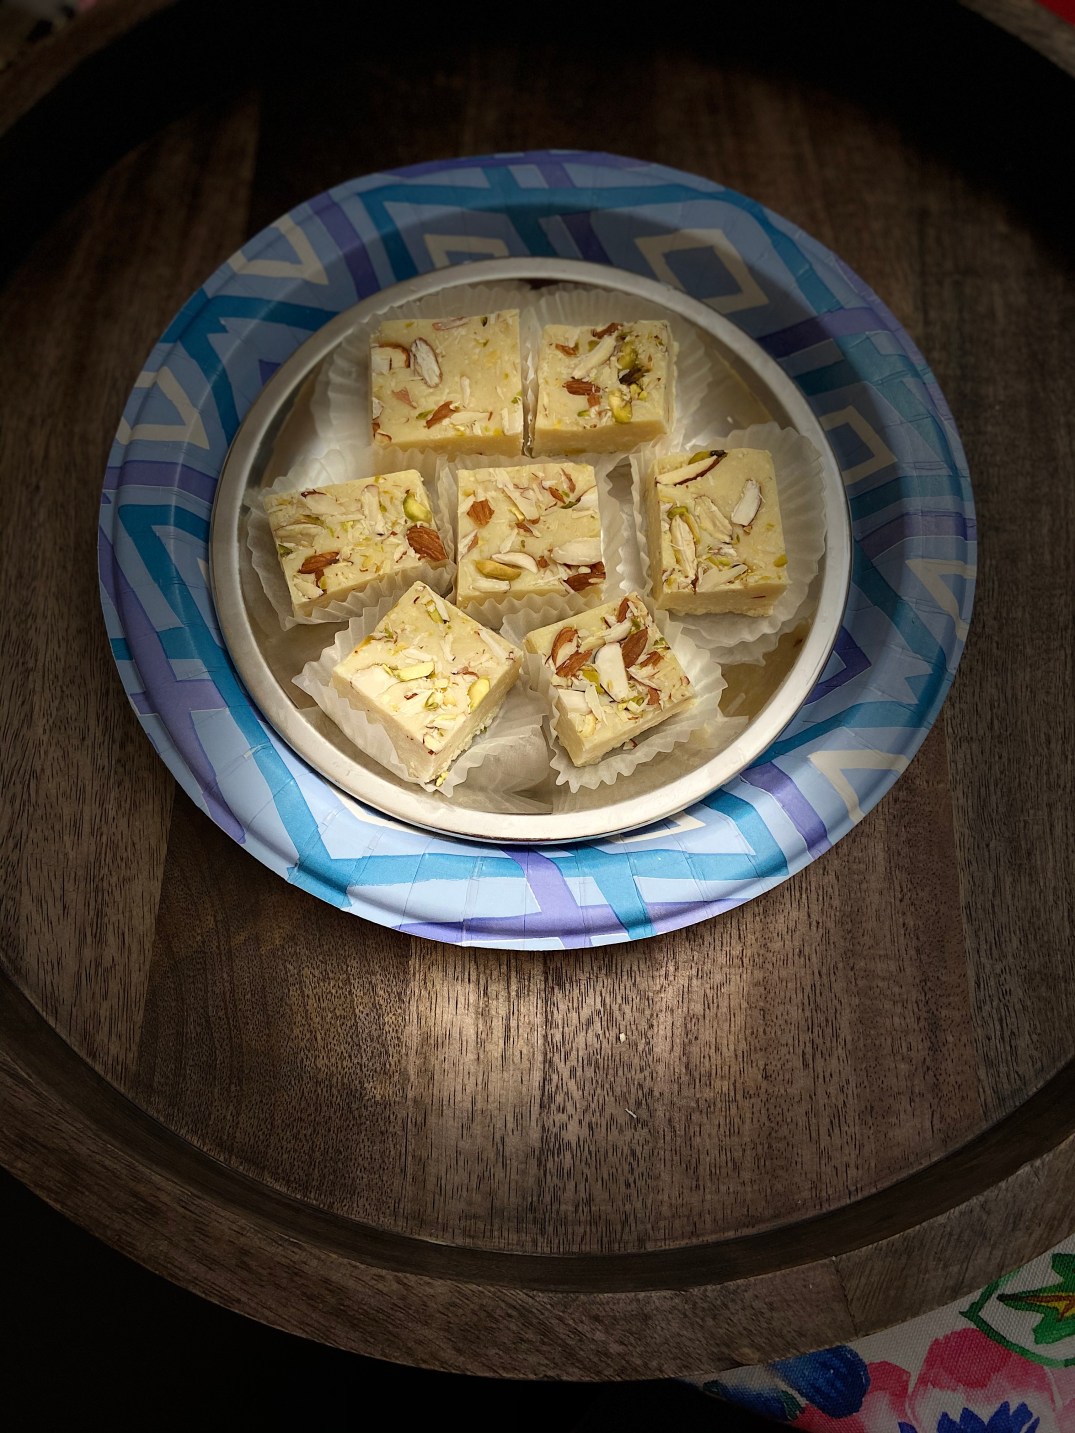
It’s a simple and easy burfi recipe or milk powder fudge recipe prepared with just 4 ingredients including milk powder, milk, ghee and sugar. It’s an ideal indian sweet recipe perfect for every indian festivals which can be prepared without much hassle and no complicated steps to follow.i prepared this to offer goddess Durga as Bhog on this pious occasion of Navratri.

Original recipe of famous blogger hebbarskitchen which i adapted and Tweaked so here i am sharing my version of Burfi which i flavored with Saffron and Screw pine essence (kwera water)

do check my other , kesar Kalakand ,coconut almond ladoo ,dulche de leche coconut ladoo and many more Sweet Recipes from my blog with this post of milk powder burfi recipe.

Ingredients

¼ cup ghee / clarified butter

¾ cup milk

2½ cup milk powder

½ cup sugar

10-12 Strands of Saffron thread (optional)

1/2 tsp of Screw pine essence

For toppings

2 tbsp almonds, chopped

2 tbsp pistachios, chopped

Craving more? Subscribe to desiswadbyaayushi to get new recipes and a weekly newsletter delivered straight to your inbox! And stay in touch on FacebookTwitter, Pinterest and Instagram for all of the latest updates.

Method

Heat a non stick pan ,firstly, add in ghee and milk.keeping the flame on low,add milk powder and sugar or add more sugar if required or you like more sweetness.

mix well making sure everything is combined well.stir continuously keeping the flame on low and no lumps formed.also stir till the sugar dissolves.

now keep stirring keeping the flame on low till milk thickens and add saffron thread .furthermore, the milk forms dough after stirring for 10 minutes.do not over cook, as the burfi turns chewy.

now the dough separates from the pan.add in screw pine essence and combine well.Turn off Flame.

transfer the prepared dough into greased plate lined with baking paper.set well forming a block.now top with few chopped almonds and pistachios and press slightly.

allow to set for 2 hours, or till it sets completely.now unmould and cut into pieces square or diamond or rectangle of your choice finally, serve milk powder burfi or store in airtight container.

Notes:-

firstly, prepare the burfi on low – medium flame, else the milk powder burns.top the burfi with dry fruits of our choice like Cashew Nuts to make it more attractive or you can skip it.

If you like plain burfi then don’t add saffron just add 1/2 tsp of cardamom powder,instead of screw pine essence you can add rose essence or don’t add any essence ,you can Skip it .

additionally, add more sugar to make burfi more sweet if you like.

burfi stays good for 2 weeks when refrigerated

Advertisement

Guacamole paratha


Guacamole Paratha Recipe is a quick to make flat bread, that makes a wholesome and delicious breakfast. The creaminess of the Avocado in the paratha is keeps the paratha soft and yet crispy from the outside. You can serve it for breakfast, a quick lunch or even pack it into a kids lunch box

I have shared by Guacamole recipe in my last blog . It has become very popular in Indian kitchens these days. so after eating with tortilla chips ,just get an idea to make something which every Indian like something Yummy & healthy too .check my other paratha recipes

Aloo Paratha

Palak Paratha

So here I am sharing Quick Version of Paratha (called as Indian flatbread)

ingredients

2 cups Whole Wheat Flour

Salt to taste

Guacamole 3-4 tbsp

1 grated carrot (optional)

oil/ghee for cooking

Craving more? Subscribe to desiswadbyaayushi to get new recipes and a weekly newsletter delivered straight to your inbox! And stay in touch on FacebookTwitter, Pinterest and Instagram for all of the latest updates.

Method

Take a mixing Bowl add the wheat flour and Guacamole and grated carrot then knead all the ingredients together until it forms a smooth dough. Do not add any water. The moisture in the guacamole will be enough to form the dough.

Cover the bowl and leave it aside for about 30 mins.

Divide the dough in small portions. Roll the portions into balls; flatten them with the palm of your hand. Toss them in flour or apply oil on rolling pin to and roll them out into thin circle.


As you roll them out, you can keep tossing the dough in dry flour to prevent sticking when rolling them out. Continue the same process of rolling the dough out with the remaining balls. It is ideal when you can roll out the all portions of dough before you can start cooking them.

Place a skillet on high heat, place the rolled out dough on the skillet. After a few seconds you will notice small air pockets popping out.

At this point flip the paratha and smear about 1/2 a teaspoon of ghee or oil and using a flat spatula and do a light pressing and turning motion to cook to the parathas. Flip to the other side and press and turn in a similar way. You will notice brown spots around the cooked paratha. Remove from heat and place on a flat plate. Continue the similar process with the remaining rolled out portions.

Serve Avocado Paratha with pickle or Curd or ketchup or pickled onion and enjoy

notes

if in case at the end you feel that the dough is little too dry, add couple of tbsp. of water to bring it together Dough.

Adding Salt to paratha dough ,just be careful as Guacamole also contain Salt.

Subscribe to get new recipes and a newsletter delivered straight to your inbox 


Homemade GUACAMOLE


The best guacamole keeps it simple just-ripe avocados, salt, a squeeze of lime, onions, chillies cilantro, Serve it as a dip at your next party or do try with any Mexican food.

All you really need to make guacamole is ripe avocados and salt. After that, a little lime or lemon juice—a splash of acidity—will help to balance the richness of the avocado. Then if you want, add chopped cilantro, chillies, onion or tomato.

do check my other condiments

INGREDIENTS

2 ripe avocados

1/4 tsp of salt, more to taste

1 tbsp fresh lime juice or lemon juice

2 tbsp to 1/4 cup of minced red

1-2 serrano chillies or any Mexican chillies (stems and seeds removed) minced or to taste

2 tablespoons cilantro (leaves and tender stems), finely chopped

Tortilla chips, to serve

Craving more? Subscribe to Tastebuds to get new recipes and a weekly newsletter delivered straight to your inbox!

And stay in touch on FacebookTwitter, Pinterest and for all of the latest updates. tag me on Instagram @tastebuds_homemade_recipes using the hashtag #tastebudshomemaderecipes and stay connected i would love to see your creations from my space!!

METHOD

Cut the avocado, remove flesh Cut the avocados in half. Remove the pit. scoop out the flesh with a spoon. Place in a bowl.

Using a fork, roughly mash the avocado. (i prefer smooth, one can leave it Chunky as Prefer)

Add salt, lime juice, and the rest: Sprinkle with salt and lime (or lemon) juice. Add the chopped onion, cilantro, and chillies. 

Start with this recipe and adjust ingredients to your taste.

Serve immediately with tortilla chips.


Tips How to check if Avocados are good or Bad

Always use ripe avocados that are just the right amount of ripeness. Not ripe enough and the avocado will be hard and tasteless. Too ripe and the taste will be not good

gently pressing the outside of the avocado if you are not able to press, the avocado is not ripe yet and will not taste good.

if you are able to press it means, the avocado is ripe and you can see the green from stem side.

if you able to press and it’s really soft and brown from stem side then avocado may be past ripe and not good. In this case, a taste test first before using.


if making a few hours ahead, place plastic wrap on the surface of the guacamole and press down to cover it and to prevent air reaching it. (The oxygen in the air causes oxidation which will turn the guacamole brown.) Refrigerate until ready to serve.

The acid in the lime juice will provide some balance to the richness of the avocado and will help delay the avocados from turning brown.

Chillies (jalapeños, serranos) vary individually in their hotness. So, start with a half of one chilli pepper and add to the guacamole to your desired degree of hotness.


Subscribe to get new recipes and a newsletter delivered straight to your inbox 


Personal Greek Pita Pizza(in a airfryer)


A quick, easy, and flavorful indian -style pizza, made with pita bread and topped with a Homemade Paneer and veggies. personal pizzas with greek pita. Topped with a good quality jarred pizza sauce, shredded cheese, marinated paneer and lot of veggies. my family love it.

ingredients

3-4 Greek pita

2 tbsp jarred pizza sauce

2 tbsp shredded pizza cheese or shredded Mozzarella or as you like

Paneer Cubes 10-12

onion medium Cube size

Bell pepper cube (yellow, red, green)

tikka masala 1 tbsp

Italian seasoning 1 tsp (optional)

red chilli flakes (optional)

Craving more? Subscribe to desiswadbyaayushi to get new recipes and a weekly newsletter delivered straight to your inbox! And stay in touch on FacebookTwitter, Pinterest and Instagram for all of the latest updates.

method

Marinate paneer cubes in Tikka masala for an hour.

meanwhile chopped veggies and cut in cubes or sliced

Making your own homemade pizza couldn’t be any quicker or easier! It’s just 10 minutes to build and cook this pita pizza, so there’s no reason not to try it! Spray the inside of the air fryer basket with non-stick cooking spray.

on top of pita apply pizza sauce and arrange veggies and marinated paneer and sprinkle Italian seasoning and red chilli flakes (optional)

put carefully pizza in air fryer and Topped it with cheese.


Cook the pita pizza in the air fryer at 400F for 5 minutes or till cheese melt

Notes

If you haven’t yet cooked pizza in your air fryer, you need to try it! The crust is so wonderfully crispy and light and cheese and tomato sauce meld together so perfectly. I promise you, you won’t be disappointed!

It’s also so quick! Just 5-6 minutes cook time, what’s not to love! If you don’t have an air fryer, you can bake these in the oven at 400F for around 10 minutes.

I have used a round white pita bread that fits right in the air fryer basket. I find the white pita gets really nice and crispy, but you can use whole grain one also.


Subscribe to get new recipes and a newsletter delivered straight to your inbox 

How to Steam idli using instantpot


In my last post ,i share how to ferment idli batter using instant pot  HOW TO FERMENT THE BATTER IN INSTANT POT?

 It is a savory rice cake, made by steaming a batter consisting of lentils and rice.  This recipe makes steamed Idli in the Instant Pot.

I have a non stock idli mold ,if you have a Stainless steel or Aluminum mold then first grease your mold with ghee or oil.  Then add small amount of batter in each mold. While you are doing this, add water to the instant pot and let it boil in Sautemode.Or you can add boiling water in inner pot and do rest same way.

IngredientsView Post

Idli Batter

1 .5 or 2 cup Water

Oil /ghee for Greasing

Method

Add water to the instant pot and heat it in saute mode until it boils.

While the water is heating, grease the idli molds with oil or ghee. Add small amount of batter in each mold.

Place the idli stand in the instant pot and cover the lid and cook it in steam mode High in venting position.

The thing to note is that the time on the instant pot does not work in the venting position, so you have to use a separate timer.  

img_7598

In 12 minutes, the idli will be ready.
0F9E2E5D-D759-4E11-884B-06924EE7BA02

You can make multiple batches of idli with the same batter.
Idli’s can be served with sambar  Sambar And Green Coconut chutney  Green Coconut Chutney  and peanut chutney  Peanut Chutney

4BF1A32E-B2CC-433F-93F5-3D569A4675F9

Eggless Chocolate Mousse


Decadent Chocolate Mousse made with only three ingredients.

It has nice light, airy and smooth texture. It is very chocolaty and perfect for chocolate lovers. My daughter favourite dessert is Anything made with chocolate.so this valentines day i prepare this Special Dessert for her.

Recipe

Ingredients

Semi Sweet or Dak Chocolate grated 3/4 cups

Whipping Cream 1 .5 cup

Powdered sugar 2 teaspoons

Cocoa powder 1/4 tsp (optional )

Method

Melt the chocolate in microwave oven on HIGH for one minute or one can melt it on a double boiler.

Whip the fresh cream along with sugar till stiff.
Remove 1/4 cup for topping and rest Fold the melted chocolate into the whipped cream.

Transfer the mixture into a glass serving bowl or into individual glasses and set in the refrigerator.

Garnish with cold whipped cream and sprinkle cocoa powder and serve chilled.

Tips:- pipe whipped cream using star nozzle or you can just put a dollop or serve without whipped cream.


C405E108-ABD1-4EAD-B30A-07EDD8BB5911389D9A47-F787-4747-9D10-7887121498B3


504AC931-4BEA-4938-B8B3-697A95D3FE9E

Instant pot kheer


Instant pot kesari Kheer (Saffron flavor Rice Pudding)

kheer is one of the easiest traditional Indian desserts one can make ,it’s  Rich, creamy pudding-like texture and flavored with cardamom and saffron.

check my other recipes Seviyan kheer  Fruity & Nutty Kheer   Sabudana Kheer

Today On this auspicious occasion of Basant Panchmi/Saraswati puja 🙏The festival marks the end of winter season and the onset of spring. Yellow foods are traditionally consumed during the festival 🙂 

Ingredients

2.5 Cup Fat free Milk Or milk of your choice

1/4 cup White Rice preferably small or medium grain, rinsed

1/2 cup Sugar (adjust to taste)

1/4 cup Mixed Nuts chopped or sliced (cashews, almonds, pistachios) (optional)

1 tbsp Raisins (optional)

1 tsp Cardamom powder

1/8 tsp Saffron (optional)

Method

Add all the ingredients in the instant pot steel insert. Close lid with vent in sealing position.

Set instant pot to PORRIDGE mode for 20 minutes on high pressure.

When instant pot beeps, let the pressure release naturally. Open Instant Pot and mix well. Rice pudding is ready. Serve warm or chilled.

If needed, to get the desired consistency, cook on SAUTE mode for 2-3 mins. Or add more milk, mix and let it boil for a minute.

Tips

If you have an extra sealing ring for sweet foods, use it.

Based on your preference, you can add sugar, nuts and raisins after pressure cooking too.