Personal Greek Pita Pizza(in a airfryer)


A quick, easy, and flavorful indian -style pizza, made with pita bread and topped with a Homemade Paneer and veggies. personal pizzas with greek pita. Topped with a good quality jarred pizza sauce, shredded cheese, marinated paneer and lot of veggies. my family love it.

ingredients

3-4 Greek pita

2 tbsp jarred pizza sauce

2 tbsp shredded pizza cheese or shredded Mozzarella or as you like

Paneer Cubes 10-12

onion medium Cube size

Bell pepper cube (yellow, red, green)

tikka masala 1 tbsp

Italian seasoning 1 tsp (optional)

red chilli flakes (optional)

Craving more? Subscribe to desiswadbyaayushi to get new recipes and a weekly newsletter delivered straight to your inbox! And stay in touch on FacebookTwitter, Pinterest and Instagram for all of the latest updates.

method

Marinate paneer cubes in Tikka masala for an hour.

meanwhile chopped veggies and cut in cubes or sliced

Making your own homemade pizza couldn’t be any quicker or easier! It’s just 10 minutes to build and cook this pita pizza, so there’s no reason not to try it! Spray the inside of the air fryer basket with non-stick cooking spray.

on top of pita apply pizza sauce and arrange veggies and marinated paneer and sprinkle Italian seasoning and red chilli flakes (optional)

put carefully pizza in air fryer and Topped it with cheese.


Cook the pita pizza in the air fryer at 400F for 5 minutes or till cheese melt

Notes

If you haven’t yet cooked pizza in your air fryer, you need to try it! The crust is so wonderfully crispy and light and cheese and tomato sauce meld together so perfectly. I promise you, you won’t be disappointed!

It’s also so quick! Just 5-6 minutes cook time, what’s not to love! If you don’t have an air fryer, you can bake these in the oven at 400F for around 10 minutes.

I have used a round white pita bread that fits right in the air fryer basket. I find the white pita gets really nice and crispy, but you can use whole grain one also.


Subscribe to get new recipes and a newsletter delivered straight to your inbox 

Please rate our website(required)

quick idli bites


Idli Bites-Super soft and spongy idlis coated in spicy and tasty masala and tempered with mustard and curry leaves coated with few spices and it really tastes yum.

do check my recipe on how to make Soft Idli and serve with Green Coconut Chutney or Peanut Chutney or coconut chutney.

Here in the United States, no one discards leftover food so I always do make something new recipe with my leftover food and even my husband told me I can develop a new recipe with any leftover food either its a snack or desserts.

Normally in South India, they use chutney podi and leftover idlis to make the podi idli or masala coated idlis but tweak the recipe and use the simple basic spices, onion slices and just little bit red chilli powder and tomato chilli ketchup for some tanginess and trust me it really taste yummy.

Craving more? Subscribe to Tastebuds to get new recipes and a weekly newsletter delivered straight to your inbox!

And stay in touch on FacebookTwitter, Pinterest and for all of the latest updates. tag me on Instagram @tastebuds_homemade_recipes using the hashtag #tastebudshomemaderecipes and stay connected I would love to see your creations from my space!!

ingredients

15-16 idlis

2-3 tablespoon extra virgin olive oil or ghee

1 tsp red chilli powder(to taste)

1 tbsp tomato chilli ketchup

1 tsp mustard seeds

few curry leaves

1 sliced onion

salt to taste

Method

Cut the idlis into four, six or eight equal parts depending upon the size of your idlis. Heat oil in a pan and add mustard seeds and curry leaves let it crackle .add sliced onion and saute till it becomes translucent add red chilli powder, ketchup and salt to taste. Add the sliced idlis into the pan and mix gently to coat the idlis in the masala.

Remove from heat and serve with your favourite chutney

NOTES

Adjust the spices as per your taste and preferences.


Subscribe to get new recipes and a newsletter delivered straight to your inbox 

Please rate our website(required)

Vada Pav


My hubby spent his earlier job days at Mumbai still somewhere inside his heart,he is a Mumbaikar  and really like Mumbai street food
one day he asked me ,do you know how to make Vada Pav ??

i had never visited Mumbai but ate this dish at a friend house here at the USA.

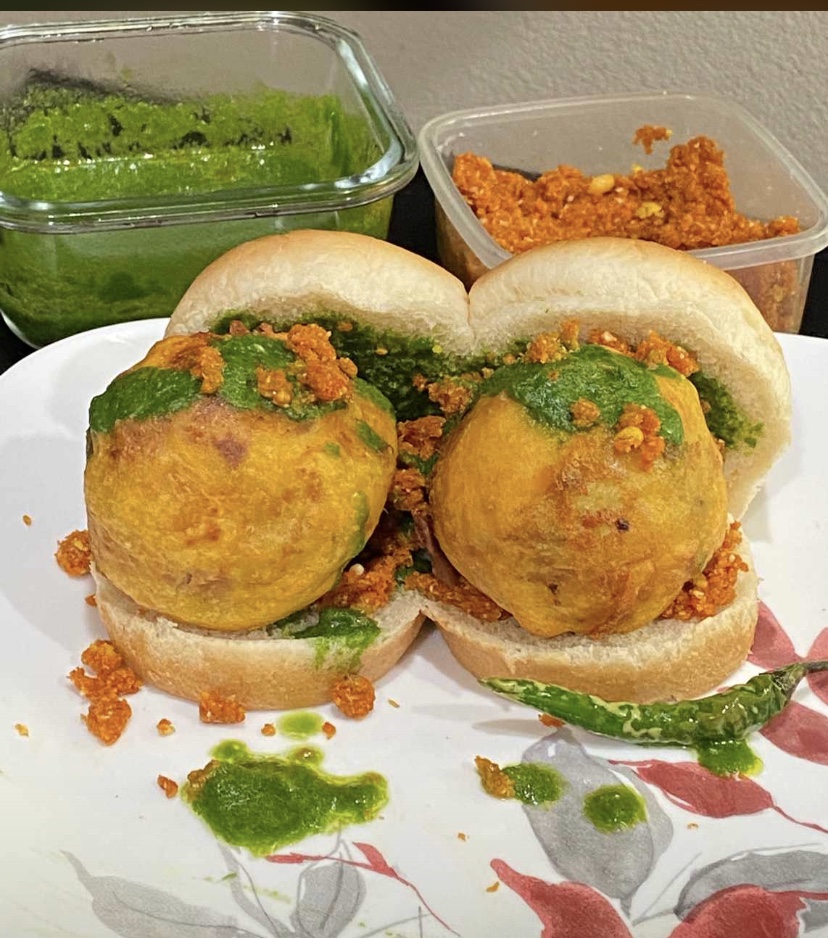
it is a vegetarian fast food/street food dish native to the state of Maharashtra. The dish consists of a deep-fried potato dumpling (vada) placed inside a bun (pav) sliced almost in half through the middle then apply a little or as much one prefer Spicy green chutney and dry garlic chutney on the inner sides of the pav and stuff with a hot vada and serve with fried green chillies.

Here I am sharing my version of Vada Pav which I prepared today the first time and he really loved it.

For today’s Vada Pav recipe, I have made everything from the scratch dry and wet chutneys and vada.Except Pav its store bought.

Ingredients

Pav or bun

For vada (potato dumplings )

Boiled potatoes 2-4

Mustard seeds 1 tsp

Turmeric 1 tsp

Curry leaves 10-12

Salt to taste

Garlic /ginger /green chilli crushed  2 tsp

Oil 1 tbsp

Batter to fry dumplings

Gram flour (Besan ) 1 cup

Red chilli 1 tsp

Turmeric 1/4 tsp

water

Salt to taste

oil for deep frying

green chilli 2-3 ( optional)

method to prepare Vada
Take oil in a pan, add mustard seeds and curry leaves Then crushed garlic ,ginger & chilli  and saute well.Now add turmeric powder, a tsp of salt, and boiled potatoes Mix them well.keep aside to cool down and make a ball of round shape or any shape you prefer.

mix all ingredients for batter and make a smooth paste.Add enough water to make a thick batter. Whisk well until you get a lump-free batter.Once the batter is ready, keep it aside for 15-20 minutes.

heat oil in a pan to fry potatoes Dumplings .

Dip the potatoes balls completely in to the besan mix and deep fry in the pan over medium heat & fry till golden brown.

Drain on an absorbent paper and keep aside. (You can make rest of Dumplings  using rest of the batter).

How to Fry Green chillies

In the same pan add green chilies and fry them.
note :- Be careful, as green chilies tend to splutter.so slit green chilli and deep fry .

For green chutney 

1 bunch cilantro /coriander leaves

1 garlic cloves 

1 green chilli 

Salt as per taste 

Lime juice 1tsp or as per taste 

mustard oil 1 tsp

method
In a grinder jar add all ingredients & Grind smooth with little bit water .Empty you jar &  pour your mixture in a container or a bowl. add oil ,i prefer Mustard oil or you can Skip it.

Dry garlic chutney

8-10 cloves 

1/4 cup desiccated coconut or fresh 

2 tsp sesame seeds 

Salt to taste 

Kashmiri red chilli powder or Red chilli 1 tbsp 

Oil 1 tsp

method
Heat pan add oil on med-low heat then add garlic and saute for 30-40 sec or till it starts browning .Same pan saute desiccated coconut on low heat (30-40 sec) & remove it .Same way sesame seeds .Let all ingredients cool down.

In a blender jar add all ingredients & add chilli powder & salt.

Press pulse button (otherwise ingredients will release oil ) once or twice & don’t make it fine leave it coarse .Chutney is ready .

Note :- i don’t have fresh coconut so i used desiccated one.My family Doesn’t like too much Spicy so i have used kashmiri red chilli powder.

How to assemble Vada Pav

Take buns or pao and put green chutney,  and dry garlic chutney inner side of both bun and keep fried potato dumplings  between them.

Serve with the garnishing of fried green chillies and sprinkle more dry garlic chuney ontop. Serve immediately.

Note :- You can adjust the amount of all chutneys as per preference.


Namakpare


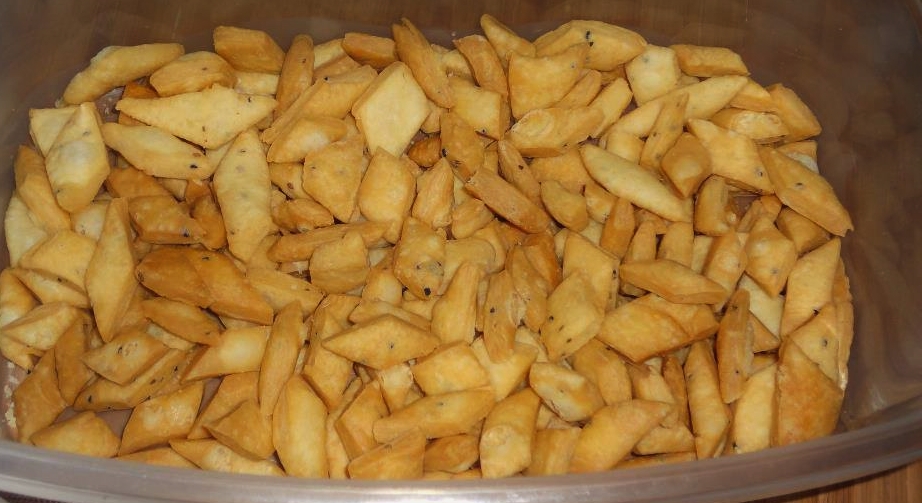
Namakpare is pastry like crunchy snack prepared using flour ,salt & lightly seasoned with carom seed  then it’s deep fried.One can have it as Tea time snacks.At my native place in Bihar,it’s called Nimki.Prepare & store up to a month in an airtight container.Preparation is easy only time taking is frying process.Usually, it’s prepared during Holi & Diwali Festival.But my family like to have whenever I prepared.

Ingredients

All Purpose flour (Maida) 1 cup

Salt 1/2 tsp or to taste

Carom seeds 1/2 tsp

Warm Oil 2 tsp

Water 1/3 cup or as required for dough

Oil for deep frying

Method
In a large mixing bowl sieve the all purpose flour & add salt, carom seeds and oil in the flour.Now while adding a little water at time start kneading dough for namakpare.and form a stiff dough. It needs to be stiffer than Chapati dough. Cover Kneaded dough &keep  aside to rest for 10 min.Now divide the dough into equal size balls.Roll it on a rolling board Like a round circle or chappati.
Now using a knife cut rolled dough into strips or a diamond shape.Heat oil in a pan for deep frying Check if oil is hot enough by adding a small piece of dough.Once the oil is ready add the dough slices of namakpare  into oil and deep fry it.Fry the namakpare  or nimki until it becomes golden in color.Once fried, take it out and place it on kitchen towel or paper for soaking extra oil.Once it cooled down Keep in a jar.
tips
roll a dough neither too thick or thin cut it into  a shapes you like.deep frying on low temperature.otherwise from outside it will be brown inside uncooked.
while it’s soft when hot once cool down  then get crispy.


Mawa Gujiya


Gujiya is a sweet dumpling made of all purpose flour and stuffed with roasted semolina or Milk solid khoya or Sweetened Coconut fillings.The outer layer is crispy & flaky while stuffing is rich & sweet.

Every part of India it’s called by different name. like Ghugra in Gujrat,Karanji @ Maharashtra, & Andhra Pradesh call Kajikayalu.

At my native in Bihar Gujiyas are called Pedakiya.It’s very popular in Bihar during a festival. There are two types of Gujiya made in Bihar: one with Roasted semolina (sooji) in which  added dry nuts cardamom powder sugar & raisins  and then deep fried in a cooking oil or ghee.another one made with filling milk Solid ,cardamom powder ,sugar & dry nuts.

My Family favourite is Mawa Gujiya which I am sharing here.

Ingredients for outer cover

All Purpose Flour – 2 cup

Milk or Yoghurt- 1/4 cup

Ghee – 4 tbsp

Cold water to make dough as required

filling ingredients

Mawa (khoya) – 1  cup

Powdered Sugar -1/4 cup or to taste

Cashew Nuts – 10-20

Raisin – 2 tbsp

Green  Cardamom Powder- 1 tsp 

Oil for frying

Method

In a bowl, add the flour & 2 tbsp of ghee and rub with your palm and fingers such that the dough appears like bread crumbs. Add  enough water to make a dough which can be rolled yet Firm dough. Divide the dough and shape into small balls. Keep aside covered for half an hour.

Meanwhile, heat a pan, add half tbsp of  ghee,add the nuts and roast till golden. Remove and cool. Once cool, make a coarse powder and set aside.In the same pan, drizzle 1/2 tbsp of ghee and add the khoya/mawa and roast for 5-6 minutes. Remove, keep aside to cool.add powdered sugar and roasted nuts into  mawa. Add the cardamom powder and mix well.keep side the prepared filling.

Now, roll each ball with the rolling pin into a thin puri Spread a tablespoon of the filling on one-half of the rolled out dough. Wet your finger and run it along the edges of the spread out dough with water and fold over to the opposite end, enclosing the stuffing to form a semi-circle shaped gujiya. Press the ends firmly so that the filling doesn’t come out during the deep frying process and use a fork to seal the edges. Alternately you can twist the edges around the gujiya.

Heat enough oil in a wide vessel to deep fry the stuffed gujiya Slowly drop 3-4 gujiyas into the oil and deep fry them on medium flame till golden brown. Turn them carefully to cook the other side as well. Drain the gujiya  with a ladle and remove to a plate.Cool and store in airtight containers. Gujiya will be  fresh for at least a week and can be stored utpo 2-3 weeks.

Hariyali Dhokla


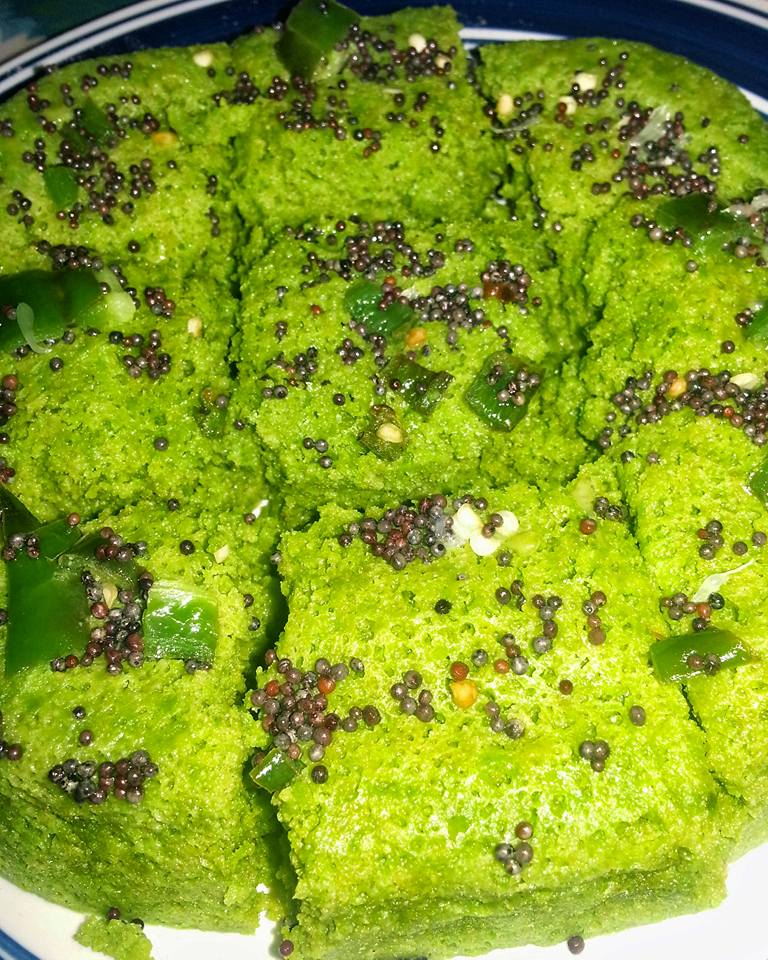
A dhokla is a spongy savory cake made of gram flour, suji (semolina) or rice powder. Dhokla recipe is a very popular Gujarati dish prepared in almost every household in India. Many variations of dhoklas such as Besan Dhokla, Suji Dhokla, Chawal Dhokla or Khaman Dhokla. it is prepared by steaming .Dhokla can be served as breakfast, evening snack or even as an appetizer.

Dhokla recipe with a tweak adding Blanched & pureed Spinach.

Ingredients

Spinach blanched & pureed 2 cup

Gram flour 1 cup

Yogurt 1/2 cup

Green chillies 1-2

Ginger chilli Paste 1 tsp

Salt to taste

Sugar 1 tsp

Asafoetida 1/4 Tsp

Fruit salt 1 tsp

Lime juice 1tsp

Oil 2 tsp

Black mustard seeds 1tsp

Method

In a bowl add gram flour,yogurt spinach puree,salt ,sugar ,green chilli ,ginger paste & 1 tsp oil mix well.Grease a plate or dish.in a big vessel adding enough water for steaming.Before pouring batter mixture into a greased plate.add fruit salt & lime juice & mix well.transfer mixture to greased plate;put in a steamer to cook.it take 10-12 min .plz check using toothpick or knife as dhokla mixture comes clean.Once done remove plate & keep aside.prepare tempering heat oil in a pan add black mustard seeds,asafoetida &chopped green chilli .pour this tempering on top of cooked dhokla.cut in shape & serve !!

Jhaal Muri


Jhaal means Spice & Muri is a puffed Rice & seasoned with Indian spices.it’s a no-cook recipe.Very light & flavorful snacks .Jhaal muri is a popular street food of Bihar & West Bengal.one can add as many ingredients like boiled potatoes ,chopped tomatoes ,peanuts& chutneys of their individual choice but mustard oil is a key ingredient to enhance taste .i am sharing  a recipe which we ate at my home.It’s a favourite Tea time snacks for us almost every day of me & my cousin.we had a lot of memories connected with this snacks lot of spicy chit-chat & secrets.

Ingredients

Puffed Rice 2 cup

Onion finely chopped 1 tbsp

Green chillies 1-2 finely chopped

Mustard oil 2tsp

Salt to taste

Paprika to taste

Lime juice 1 tsp

Green coriander leaves/cilantro 1 tbsp for garnishing

Method

Mix all ingredients in a bowl.garnish with chopped green coriander leaves.enjoy with a cup of Ginger Tea.

My entry for Semi Home Made Collective – May 2016 @Sonal Gupta blog. http://simplyvegetarian777.com/ .plz do check her blog for awesome & delectable  Vegetarian food.